Introduction
There is almost nothing in the world of fitness more deceptively simple — and more frequently done wrong — than the humble pushup. It requires zero equipment, can be performed anywhere on earth, and delivers genuine, measurable results. And yet, the majority of beginners who drop down and attempt their first one do it in a way that either produces no real benefit or quietly sets them up for injury.
This guide exists to change that. Whether you have never done a pushup in your life or you have been doing them messily for years, what follows will walk you through everything you need to know — the correct positioning, the muscles being worked, the common errors to eliminate, and a smart progression to build from. The pushup deserves your full attention and respect, and once you do it properly, you will understand exactly why it has remained the cornerstone of bodyweight training for centuries.
Why the Pushup Is Worth Your Time
Before diving into mechanics, it is worth understanding what you are actually building when you train this movement. A properly executed pushup is a compound exercise, meaning it activates multiple muscle groups simultaneously. The primary movers are the pectorals (chest), anterior deltoids (front of the shoulders), and triceps. But that is only part of the story.
Your core — including the transverse abdominis, obliques, and lower back muscles — has to fire continuously to prevent your hips from sagging or piking upward. Your serratus anterior, the fan-shaped muscle along your ribcage, stabilizes your shoulder blades. Even your glutes engage to keep the body rigid. This is what makes the pushup such an efficient, full-system exercise when done correctly.
According to research published by the American Council on Exercise (ACE), the pushup ranks among the most effective upper-body exercises for muscle activation across multiple joints and groups. It also improves shoulder health, develops neuromuscular coordination, and builds the kind of functional strength that transfers to everyday movement. In short, the pushup is one of the best investments of your fitness time — and it costs absolutely nothing.
“The pushup is not a simple movement — it is a full-body tension drill disguised as a chest exercise. Master it and you master a fundamental pattern of human strength.”
Setting Up Your Pushup: The Foundation Before You Move
The biggest mistake beginners make is jumping straight into the movement without thinking about the setup. A good pushup begins before a single inch of travel happens. Your body position is everything.
Hand Placement
Place your hands on the floor at roughly shoulder-width apart, with fingers spread wide and pointing forward or very slightly outward. Your hands should sit directly below — or just slightly outside — your shoulders when your arms are extended. Many beginners place their hands too far forward, which shifts load away from the chest and puts excessive strain on the wrists.
Think about gripping the floor: create a sensation of screwing your hands outward into the ground without actually moving them. This external rotation activates the lats and stabilizes the shoulder joint, making the whole movement safer and more powerful.
Body Alignment
Your body from head to heel should form one straight, rigid line — like a plank of wood. This is not a metaphor; it is a precise physical requirement. Tuck your tailbone slightly, squeeze your glutes, brace your core as if someone is about to prod your stomach, and keep your neck neutral so your gaze falls about 6–12 inches in front of your hands. Do not let your head hang or crane upward.
If you were to view a perfect pushup from the side, you would see a single diagonal line from ankle to ear. Anything else — a sagging belly, a raised backside, a dropped chin — is a form break that needs to be corrected.
Form Checkpoint — Before You Begin: Hands directly under shoulders, fingers spread and gripping the floor. Body rigid from head to heels, glutes squeezed, core braced. Neck neutral — eyes focused on the floor about one foot ahead. Elbows not flared out; ready to track at roughly 45 degrees from torso.
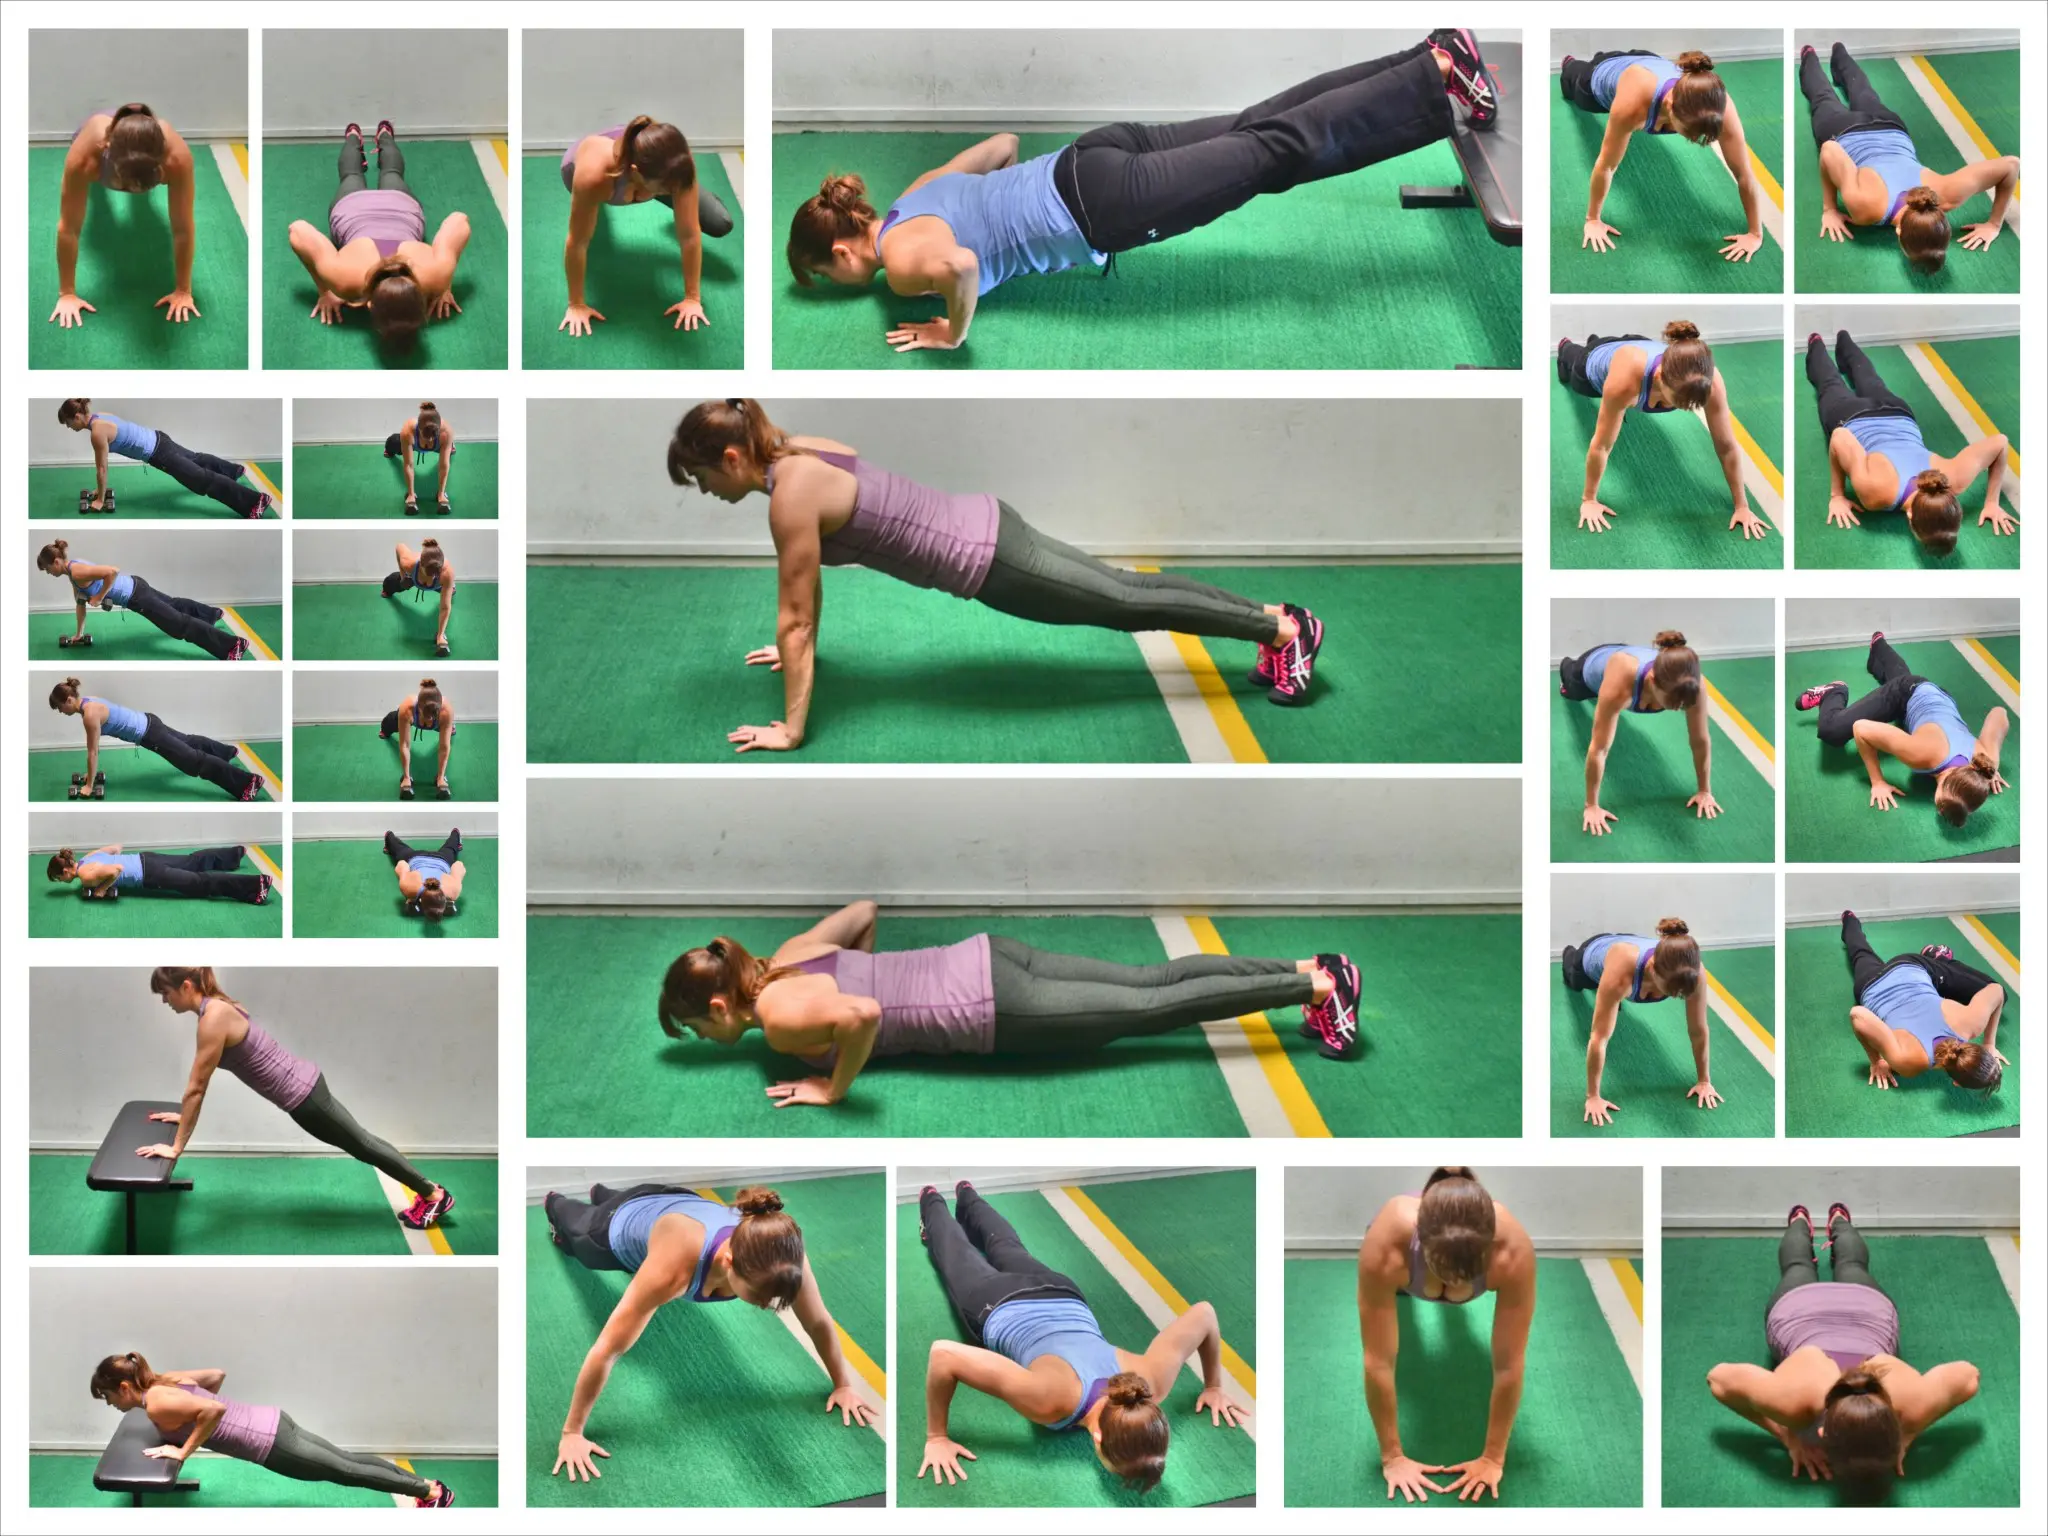
How to Perform the Perfect Pushup — Step by Step
Now that your starting position is locked in, it is time to move. A complete pushup repetition has two phases: the descent (eccentric) and the ascent (concentric). Both matter equally, and controlling each is what separates a productive repetition from a sloppy one.
The Descent
Begin by lowering your body as one unit toward the floor. Your elbows should bend and flare outward at approximately 45 degrees from your torso — not straight out to the sides (which stresses the shoulder joint) and not tucked entirely against your ribs (which can limit range of motion for beginners). As you descend, keep every muscle engaged. The tendency for beginners is to let the hips either sink or rise during this phase; fight both with active core tension.
Lower until your chest is either touching or hovering just above the floor. Do not stop halfway down; partial range of motion delivers partial results. The full range is what builds real strength and flexibility through the joint. Take two to three seconds on the way down — a controlled descent is far more valuable than a rushed drop.
The Ascent
From the bottom position, press the floor away from you — not just push yourself up. This cue changes everything. When you think about pressing the floor downward, you naturally engage your chest, shoulders, and triceps more completely. Drive through your palms until your arms are fully extended, but do not lock your elbows aggressively at the top. Maintain slight tension throughout.
Breathe in on the way down and breathe out forcefully on the way up. This breathing pattern helps maintain intra-abdominal pressure and keeps your core stable during the hardest part of each pushup repetition.
Common Mistake to Avoid: Never let your lower back collapse or your hips pike up during any phase of the movement. If either is happening consistently, your core is not strong enough yet to support full pushups — and that is completely fine. Start with a modification and build up properly.
Beginner Modifications — Starting Where You Actually Are
One of the most confidence-damaging things a beginner can do is force full pushups before the body is ready. The good news is that this exercise has a beautiful range of progressions, and starting at an easier variation is not a compromise — it is the smart path to getting where you want to go.
Wall Pushups
Stand arm’s length from a wall and place your hands flat against it at chest height. Perform the same movement pattern: lean in with a rigid body, then press back. This is a genuine pushup at a reduced loading angle and a perfect entry point for absolute beginners. It trains the correct pattern without the full bodyweight load.
Incline Pushups
Place your hands on an elevated surface — a sturdy table, a bench, or even a countertop. The higher the surface, the easier the movement. As you grow stronger, lower the surface height progressively until you can perform the movement on the floor. This is arguably the most effective progression route available.
Knee Pushups
With your knees on the floor and ankles crossed, you reduce the load while maintaining full range of motion. The critical note here: keep your hips in line with your shoulders. Many people perform knee pushups with their hips behind their knees, which creates poor positioning habits. Even in a modified pushup, the goal is to maintain a straight line from knee to shoulder.
How to Progress and Build Up Over Time
Progression in any strength exercise follows a simple principle: gradually increase the demand on the body over time. For the pushup, this means moving through modifications, increasing total volume, and eventually exploring harder variations once the standard form is solid.
A sensible beginner’s approach is to aim for two to three sets per session, three times per week, with a full day of rest between sessions. Start at whatever modification allows you to complete 8–10 clean repetitions. As that becomes easier, add one or two reps per week. When you can comfortably complete three sets of 15–20 clean reps at any given modification level, move to the next harder progression.
This is also a good time to introduce variety. Once you have mastered the standard floor pushup, you can explore wide-grip pushups (which emphasize the chest), close-grip or diamond pushups (which target the triceps more heavily), decline pushups (which shift load toward the upper chest and front deltoids), and eventually pike or archer pushups as advanced bodyweight strength goals. The pushup is a family of movements, not a single exercise, and exploring it keeps training fresh and continuously challenging.
According to National Strength and Conditioning Association (NSCA) guidelines, progressive overload — the systematic increase in training demand — is the foundational principle of all strength development. Applied to the pushup, this simply means doing a little more than last time, consistently, over weeks and months.
Muscles Worked and the Benefits You Can Expect
Understanding what the pushup actually does to your body helps maintain motivation and informs smarter training decisions. The primary muscles targeted are the pectoralis major (the main chest muscle), the anterior deltoid (front shoulder), and the triceps brachii. These are the prime movers in the pressing pattern.
The supporting cast includes the serratus anterior (which protracts the shoulder blade at the top of each rep), the core musculature, the glutes, and even the quads when full-body tension is maintained. Over time, consistent pushup training builds noticeable chest and shoulder definition, strengthens the elbow joint, improves pushing power for sports and daily activities, and contributes to better posture by strengthening the muscles that counter habitual slouching.
For beginners, the strength gains from consistent pushup training come relatively quickly — often within four to six weeks of consistent practice, assuming proper form is maintained and progressive overload is applied. This rapid early progress is one of the most motivating aspects of starting a bodyweight training routine.
Mistakes That Hold Beginners Back — and How to Fix Them
Beyond the obvious form errors already mentioned, there are several subtler mistakes that prevent beginners from getting the most out of this exercise. The first is rushing. Moving too quickly through repetitions removes the tension from the muscles and turns the movement into a momentum drill. Slow down, feel every inch of the range, and keep the muscles loaded throughout.
The second common error is ignoring wrist discomfort. Many beginners experience pain in the wrists when they begin pushup training, often because the wrists are not conditioned for load in an extended position. If this is happening, try performing pushups on fists (which keeps the wrists neutral), or invest in a pair of pushup handles. Never push through sharp joint pain — that is a signal to stop, not to toughen up.
Third, many beginners breathe incorrectly or hold their breath entirely. Breathing should be rhythmic: inhale on the descent, exhale on the press. Holding your breath during a pushup increases blood pressure unnecessarily and reduces your overall stamina. Get into the habit of breathing deliberately from your very first session.
Building a Consistent Pushup Habit
Consistency beats intensity every single time in beginner fitness. It is far more valuable to perform ten perfect pushups every other day than to grind out fifty sloppy ones once a week. The body adapts to repeated, graduated stress over time — not to occasional bursts of effort.
Try anchoring your pushup practice to an existing habit. Do a set before your morning coffee, after brushing your teeth at night, or at the end of your lunch break. Small, regular practice builds the neural pathways that make the movement feel natural, and it also builds the identity of someone who exercises — which turns out to matter enormously for long-term adherence.
Tracking your progress in a simple journal or phone note is also tremendously helpful. Write down how many reps you completed in each set, what modification you used, and how it felt. This creates visible evidence of improvement that sustains motivation through the inevitable plateaus that all beginners encounter.
Conclusion
The pushup is not a stepping stone to “real” exercise — it is real exercise. It is one of the most complete, efficient, and accessible strength movements ever developed, and when done correctly, it can form the backbone of a genuinely effective training routine for years. The key word, as this guide has emphasized throughout, is correctly.
Start where you are. If that means the wall, begin at the wall. If it means incline reps at a kitchen counter, begin there. What matters is that every single repetition you perform is clean, controlled, and building something real. The correct pushup done consistently will deliver results that no amount of sloppy reps ever could.
Give this movement the focus it deserves, apply the form cues in this guide with genuine attention, and progress patiently through the modifications. You will be doing full floor pushups with excellent form sooner than you think — and when that day arrives, you will understand exactly why serious fitness coaches have been prescribing this exercise for as long as training has existed.
Frequently Asked Questions
How many pushups should a beginner aim for?
There is no universal target for beginners. Start with whatever number allows you to maintain perfect form — even if that is just 3 or 4 repetitions per set. Quality is the only metric that matters at the beginning. Over time, aim to add 1–2 reps per week until you reach 10–15 clean repetitions per set, then work toward three sets at that level before increasing further.
Is it okay to do pushups every day?
Training the same muscles every day without rest can lead to overuse and slowed recovery, especially for beginners. A more effective approach is to train three to four times per week with at least one full rest day between sessions. As your conditioning improves over several months, some people move to daily training — but beginners should prioritize recovery early on.
Why do my wrists hurt when I do pushups?
Wrist discomfort in pushup training is common among beginners because the wrists are not yet conditioned for load in an extended position. To reduce this, try distributing your weight more evenly across your entire palm, keeping your fingers spread wide. Performing pushups on fists or using pushup handles (which keep the wrists in a neutral grip position) can eliminate the issue entirely while you build wrist strength and mobility over time.
What is the correct elbow position during a pushup?
Your elbows should track at approximately 45 degrees from your torso as you lower and press — not flared straight out to the sides (which strains the shoulder joint) and not pressed tightly against your ribs. The 45-degree angle balances shoulder safety with effective muscle engagement, and it is the position used by strength coaches and physiotherapists as the gold standard for pushup form.
How long does it take to go from zero to a full floor pushup?
With consistent training three times per week using proper progressions — starting from wall or incline pushups — most beginners can perform full floor pushups with good form within 4 to 8 weeks. The exact timeline depends on starting fitness level, bodyweight, consistency, and quality of nutrition and sleep. Following a structured progression and tracking improvements regularly will ensure steady, reliable progress.