There is a reason the cappuccino has remained one of the world’s most beloved coffee drinks for over a century. It is the perfect balance of bold espresso, velvety steamed milk, and a cloud of dense, airy foam — three simple components that, when combined correctly, create something genuinely extraordinary. Walk into any coffee shop worth its beans and you’ll find it near the top of the menu, usually with a price tag to match.
But here is the truth most coffee drinkers discover eventually: a great cappuccino does not require a barista or an expensive café visit. It requires an understanding of the fundamentals, a few pieces of accessible equipment, and a willingness to practice the technique until it becomes second nature. Making a cappuccino at home is not only achievable — it can be deeply satisfying in a way that buying one never quite is.
This guide walks you through everything from the history and anatomy of a proper cappuccino to the equipment you need, the step-by-step process, milk frothing techniques, common mistakes, and how to customize your drink once you’ve mastered the classic version. Whether you’re a complete beginner or a home barista looking to refine your craft, this is the resource you’ve been looking for.
What Exactly Is a Cappuccino?
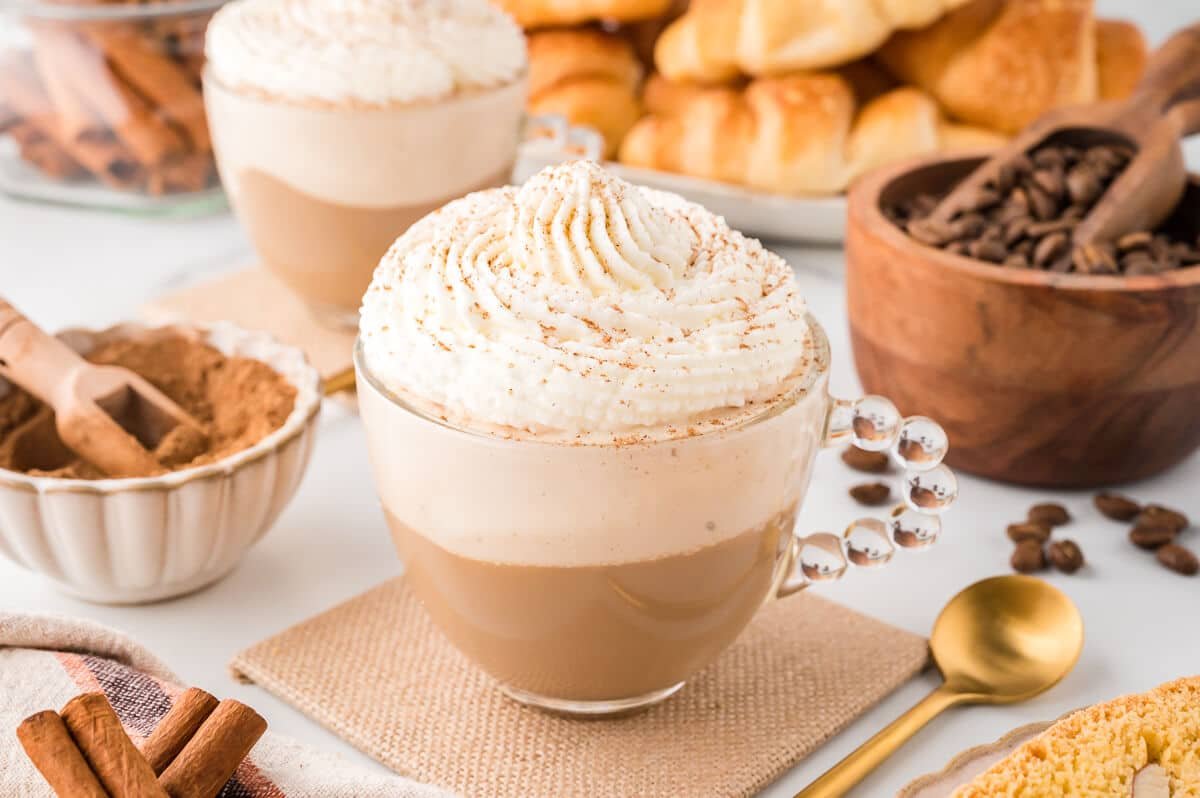
Before diving into technique, it helps to understand what you are actually trying to make. A traditional cappuccino is an Italian espresso-based drink composed of three equal parts: one part espresso, one part steamed milk, and one part milk foam. Each layer plays a distinct role in the final experience.
The espresso provides the backbone — a concentrated, intensely flavored shot with a thin layer of golden crema on top. The steamed milk adds body, sweetness, and creaminess that softens the espresso’s sharpness. The foam sits on top, creating a thick, textured layer that insulates the drink and delivers a different mouthfeel with every sip.
The word “cappuccino” comes from the Italian word for “hood” or “cap” — a reference to the Capuchin friars whose brown robes inspired the drink’s color. The drink as we know it today was perfected in Italy in the early 20th century and has since become a global standard of coffee culture, recognized by the Specialty Coffee Association as one of the benchmark drinks by which barista skill is measured.
Understanding this three-part architecture is essential because every decision you make when crafting a cappuccino at home — from the grind size of your coffee to the temperature of your milk — serves one of these three components.
Equipment You Need to Make a Cappuccino at Home
One of the most common misconceptions about making a cappuccino at home is that you need an expensive, commercial-grade espresso machine. While professional equipment certainly helps, excellent results are achievable across a range of budgets.
Espresso Machines
A dedicated espresso machine with a steam wand is the gold standard for home cappuccino making. Entry-level machines from brands like Breville, De’Longhi, and Gaggia can produce quality espresso and steam milk effectively at prices that are reasonable for serious home cooks. The Breville Bambino and De’Longhi Dedica are both widely praised in the home barista community for delivering consistent results without a steep learning curve.
If a full espresso machine is outside your budget, a Moka pot is an accessible and affordable alternative. While technically a stovetop brewer that produces a concentrated coffee rather than true espresso, the Moka pot makes a strong, rich brew that works beautifully as the foundation of a cappuccino. It has been a staple in Italian homes for nearly a century and remains a respected tool in any coffee lover’s kitchen.
Milk Frothing Options
If your espresso machine has a built-in steam wand, you already have the best frothing tool available. For those without one, a handheld electric milk frother — available for under fifteen dollars — can produce surprisingly good foam, especially for a dry cappuccino style. A French press can also be used to froth milk by pumping the plunger rapidly after heating the milk on the stove, creating decent foam in about 30 seconds.
The Grinder
Coffee grind consistency is one of the most underappreciated variables in home espresso. Pre-ground coffee oxidizes quickly and loses flavor within days of opening. A burr grinder — even an inexpensive hand grinder — produces a far more consistent grind than a blade grinder and dramatically improves the quality of your espresso base. For a great cappuccino, the espresso shot is everything, and a good grind is the foundation of a good shot.
The Cup
A traditional cappuccino is served in a ceramic cup of 150 to 180 ml capacity — roughly 5 to 6 ounces. This size maintains the correct ratios between espresso, milk, and foam. Using an oversized mug throws off the proportions, dilutes the espresso flavor, and compromises the layering effect that defines the drink.
Choosing the Right Coffee for Your Cappuccino
The espresso you use matters enormously. Not all coffee beans are created equal, and some are far better suited to espresso-based drinks like a cappuccino than others.
Roast Level
Medium to dark roast beans are traditionally preferred for espresso because they produce lower acidity, fuller body, and the chocolatey, caramel, and nutty flavor notes that pair beautifully with steamed milk. Light roast beans, while increasingly popular for filter coffee, tend to produce espresso that is bright and acidic — qualities that can feel sharp and unbalanced when combined with milk.
Single Origin vs. Blend
Espresso blends are formulated specifically for consistency and balance in milk-based drinks. They are designed to maintain their character even when diluted with steamed milk, making them the most reliable choice for a home cappuccino. Single origin espressos can be extraordinary on their own but sometimes lose nuance when paired with milk.
Freshness
Coffee begins losing its best flavors within days of roasting. For espresso, beans that are between 7 and 21 days post-roast are generally considered to be at their peak. Look for roasters who print a roast date on the bag — not just a best-by date — so you know exactly how fresh your coffee is.
Step-by-Step: How to Make a Cappuccino at Home
With your equipment ready and your coffee selected, here is the complete process for crafting a classic cappuccino from start to finish.
Step One — Prepare Your Espresso
Begin by grinding your coffee fresh immediately before brewing. For a single shot of espresso, you’ll need approximately 7 to 9 grams of coffee ground to a fine, powdery consistency — finer than table salt but not as fine as flour. For a double shot, use 14 to 18 grams.
Tamp the grounds firmly and evenly into the portafilter using a tamper. Apply approximately 30 pounds of pressure and ensure the surface is level before locking the portafilter into the machine. A well-tamped puck creates the resistance the water needs to extract flavor slowly and evenly.
Pull your shot. A properly extracted single espresso shot takes 25 to 30 seconds and produces approximately 30 ml of liquid with a rich, golden-brown crema on top. If the shot runs faster than 20 seconds, your grind is too coarse. If it takes longer than 35 seconds, it is too fine. Adjust accordingly and re-pull until you find the sweet spot.
A well-pulled shot is the heart of any great cappuccino — everything else supports it.
Step Two — Steam and Froth Your Milk
For a traditional cappuccino, you’ll need approximately 60 ml of whole milk — enough to create both the steamed milk and foam layers when combined.
Pour cold milk into your frothing pitcher, filling it no more than one-third full. Cold milk froths better than warm milk because the lower starting temperature gives you more time to develop foam before the milk overheats.
Purge your steam wand briefly by releasing a burst of steam before submerging it. This clears any condensed water from inside the wand. Submerge the wand tip just below the milk surface and open the steam valve fully.
Position the wand slightly off-center to create a gentle rotational vortex in the milk. Keep the tip just at or slightly below the surface for the first 5 to 8 seconds — you’ll hear a soft hissing sound as air incorporates into the milk and the foam begins forming. This is called the “stretching” phase.
Once the foam has developed, lower the pitcher slightly so the wand tip is deeper in the milk, continuing to heat and swirl without incorporating more air. Stop steaming when the pitcher feels hot to the touch — milk for a cappuccino should reach approximately 60 to 65°C (140 to 150°F). Going above 70°C scalds the milk and destroys its natural sweetness.
After steaming, tap the pitcher firmly on the counter a few times to burst any large bubbles, then swirl the milk with a circular wrist motion to integrate the foam and liquid into a glossy, paint-like consistency. Well-textured milk for a cappuccino looks like wet microfoam — smooth, dense, and glossy rather than bubbly or separated.
Step Three — Assemble Your Cappuccino
Pour your freshly pulled espresso shot into your preheated cappuccino cup. To preheat the cup, simply rinse it with hot water from your machine or kettle and discard the water immediately before pouring.
Now pour your textured milk. Hold the pitcher close to the cup and pour slowly and steadily, allowing the denser steamed milk to flow in first while the lighter foam naturally rises to the top. A traditional cappuccino has a clearly defined layer of thick foam sitting on top, roughly 1 to 2 cm deep.
If you want to try basic latte art — a heart or simple rosette — tilt the cup at a slight angle, pour in a thin stream first to create the espresso-milk base layer, then bring the pitcher closer and wiggle gently as you pour to push the foam into a pattern. Latte art takes practice but elevates even a home cappuccino into something visually impressive.
Wet vs. Dry Cappuccino — What’s the Difference?
Not all cappuccinos are built the same way, and knowing the variations helps you order or make exactly what you want.
A wet cappuccino has more steamed milk and less foam, resulting in a creamier, softer drink that sits closer in texture to a latte. It is a good choice for people who enjoy the cappuccino flavor profile but find traditional foam too thick or airy.
A dry cappuccino has little to no steamed milk and is almost entirely espresso topped with a thick, dense layer of dry foam. The foam acts as an insulating cap that keeps the espresso hot while you work through it. This is the more traditional Italian preparation and the version most baristas default to when no preference is specified.
A bone dry cappuccino takes this to the extreme — espresso only, topped with foam and no steamed milk whatsoever. It is an intensely concentrated drink for those who want maximum coffee flavor with a textural contrast from the foam.
Understanding where your preference lies on this spectrum makes every cappuccino you make at home a drink tailored precisely to your palate.
Common Cappuccino Mistakes and How to Fix Them
Even with the best ingredients and equipment, a few consistent errors can undermine your results. Knowing what to watch for saves you from the frustration of repeated disappointment.
Overheating the milk is perhaps the most common mistake home baristas make. Milk heated above 70°C loses its natural sweetness, develops a slightly cooked or even burned flavor, and produces foam that separates quickly rather than holding its structure. Always stop steaming when the pitcher is hot but still comfortable to hold briefly.
Under-extracting the espresso produces a sour, weak shot that no amount of creamy foam can rescue. If your shot tastes sharp or thin, your grind is likely too coarse, your dose too low, or your tamping pressure too light. Adjust one variable at a time until the shot balances sweetness, bitterness, and body.
Using too much milk for the cup size destroys the ratio that makes a cappuccino distinct from a latte. Stick to 60 ml of milk total for a 150 ml cup and resist the urge to fill it higher.
Skipping the cup preheat seems trivial but matters more than most people expect. A cold cup drops the temperature of your espresso shot by several degrees in seconds, and the resulting cappuccino tastes flat and lukewarm before you’ve even added the milk. Thirty seconds of preheating makes a real difference.
Dairy-Free and Alternative Milk Cappuccinos
The growing availability of high-quality plant-based milks has expanded the home cappuccino landscape considerably. While whole cow’s milk remains the gold standard for frothing due to its fat and protein content, several alternatives perform well enough to make a genuinely enjoyable dairy-free cappuccino.
Oat milk is currently the most popular alternative among specialty coffee shops and home baristas alike. Barista-formulated oat milk varieties from brands like Oatly and Minor Figures are specifically designed to steam and froth in a way that closely mimics whole milk, producing dense microfoam and a naturally sweet, creamy flavor that complements espresso beautifully.
Soy milk has the highest protein content of the common plant-based alternatives, which technically makes it the best candidate for frothing. However, it can be sensitive to the acidity of espresso and may curdle slightly if poured incorrectly. Adding the milk before the espresso or using a lower-acid bean minimizes this issue.
Almond milk and coconut milk tend to produce lighter, less stable foam and work better in a wet cappuccino style where heavy foam is not the priority. For a dry-style cappuccino with substantial foam, oat or soy milk will consistently outperform them.
Conclusion: Your Perfect Cappuccino Is Closer Than You Think
Making a great cappuccino at home is a skill built on understanding rather than complexity. Once you grasp the three-part structure of the drink — espresso, steamed milk, and foam — and understand what each variable does, the path to consistently excellent results becomes clear and repeatable.
Start with fresh, quality beans. Pull your shot with attention to timing and yield. Steam your milk with care, stopping before it overheats. Assemble with purpose, pour with patience, and taste critically so each cup teaches you something the next one benefits from.
The first cappuccino you make at home may not be perfect. The fifth will be noticeably better. By the tenth, you may find yourself wondering why you ever paid café prices for something you can make so confidently in your own kitchen. That is the quiet satisfaction of mastering a craft — and it starts with one good shot.
Frequently Asked Questions (FAQs)
Q1: What is the difference between a cappuccino and a latte?
A cappuccino and a latte both combine espresso and steamed milk, but in different proportions. A cappuccino is made with equal parts espresso, steamed milk, and thick foam — giving it a stronger coffee flavor and a drier, foamier texture. A latte uses significantly more steamed milk and only a thin layer of microfoam on top, resulting in a creamier, milder drink. A standard latte is typically 8 to 12 oz while a cappuccino is traditionally served in a 5 to 6 oz cup.
Q2: Can I make a cappuccino without an espresso machine?
Yes. A Moka pot produces a strong, concentrated coffee that works well as the espresso base in a home cappuccino. You can froth milk using a handheld electric frother, a French press, or even by shaking warm milk in a sealed jar. The result won’t be identical to a machine-made cappuccino, but it can be genuinely delicious with the right technique and quality coffee.
Q3: What milk is best for frothing a cappuccino?
Whole cow’s milk froths the best due to its ideal balance of fat and protein, producing dense, stable microfoam with a naturally sweet flavor. Among plant-based alternatives, barista-formulated oat milk performs closest to whole milk and is the most popular dairy-free choice in specialty coffee. Avoid ultra-low fat milks as they produce thinner, less stable foam.
Q4: How hot should the milk be for a cappuccino?
Milk for a cappuccino should be steamed to between 60 and 65°C (140 to 150°F). This range preserves the milk’s natural sweetness and produces stable, glossy foam. Heating milk above 70°C (158°F) scalds it, resulting in a slightly burned flavor and foam that separates quickly. If you don’t have a thermometer, stop steaming when the pitcher feels hot but you can still hold it comfortably for about two seconds.
Q5: Why does my cappuccino foam collapse quickly?
Foam collapses quickly for a few common reasons. Overheated milk loses the proteins that give foam its structure, causing it to separate and flatten within minutes. Insufficient frothing time means not enough air has been incorporated into the milk. Using skimmed or low-fat milk produces thin foam that cannot hold its structure. Using barista-grade whole milk or oat milk, steaming to the correct temperature, and properly swirling the pitcher after steaming to create microfoam will produce foam that holds its shape throughout the entire drink.
How Long to Boil Corn on the Cob