Introduction
Open any microwave in any kitchen and there’s a reasonable chance you’ll find splattered tomato sauce on the ceiling, a ring of dried soup on the turntable, and a smell that tells an entire story about last Tuesday’s leftovers. It happens to everyone. The microwave is the most frequently used appliance in most kitchens — and somehow also the most frequently overlooked when it comes to cleaning.
The good news is that learning how to clean a microwave properly doesn’t require special products, a lot of time, or any real effort beyond what you’re already willing to give. A few common household ingredients, the right technique, and about 15 to 20 minutes is genuinely all it takes to restore your microwave from grim to gleaming.
Knowing how to clean a microwave isn’t just about appearances, either. Food residue left inside a microwave can harbor bacteria, create unpleasant smells that transfer to fresh food, affect the efficiency of the appliance, and in extreme cases, even pose a fire risk if grease deposits accumulate over time. This guide covers every method worth knowing — from quick weekday freshening to deep-cleaning sessions — so you can keep your microwave in excellent shape no matter how busy life gets.
Why a Dirty Microwave Is More of a Problem Than You Think
Most people treat a dirty microwave as purely a cosmetic issue — something mildly embarrassing when guests are over, but otherwise harmless. The reality is a bit more serious than that.
Hardened food splatter inside a microwave can absorb microwave energy during cooking cycles, causing uneven heating and making your appliance work harder than it needs to. Over time, this extra strain can shorten the appliance’s lifespan. According to the USDA Food Safety and Inspection Service, bacteria can multiply rapidly in food residue left at room temperature — and an uncleaned microwave interior creates exactly the kind of contaminated surface that can transfer bacteria to the food you’re reheating.
Beyond safety, there’s the practical issue of odors. Old food residue releases volatile compounds as the microwave heats, and those compounds don’t discriminate — they’ll happily flavor your freshly reheated coffee or tonight’s leftovers with whatever you cooked three weeks ago. A regular habit of cleaning the microwave eliminates this problem entirely.
What You Need to Clean a Microwave at Home
Before diving into the methods themselves, it’s worth knowing that you don’t need to buy anything special. The most effective microwave cleaning solutions are built from ingredients already in your kitchen: white vinegar, lemon juice, baking soda, dish soap, and water.
A microwave-safe bowl or measuring cup, a few clean cloths or paper towels, a sponge, and optionally a toothbrush for tight corners round out everything you need. For particularly stubborn baked-on spots, a plastic scraper or the rough side of a sponge can help without scratching the interior walls.
Avoid abrasive scrubbers or harsh chemical sprays inside the microwave cavity. The interior coating of most microwaves is relatively delicate and can be damaged by aggressive scrubbing, and chemical residue from strong cleaners can linger and transfer to food during subsequent use.
How to Clean a Microwave with Vinegar: The Steam Method
This is the gold standard for how to clean a microwave quickly and with minimal effort. The principle is simple: steam loosens dried food particles and grease so they wipe away without scrubbing.
Setting Up the Steam Treatment
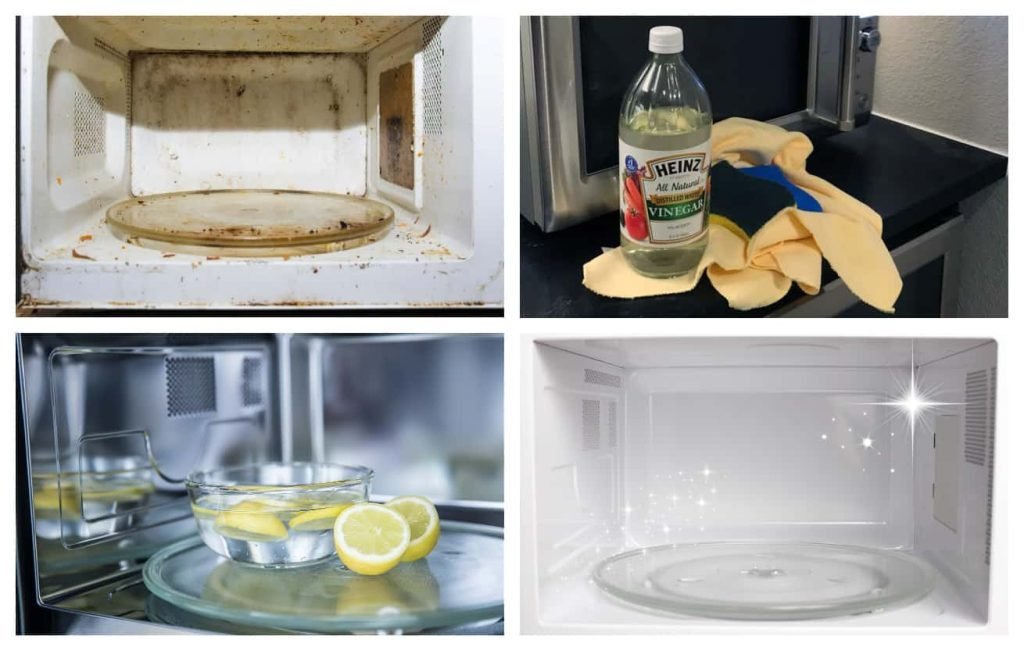
Fill a microwave-safe bowl with one cup of water and add two to three tablespoons of white vinegar. Place it inside the microwave and heat on high for five minutes. Don’t open the door immediately — let it stand for an additional two to three minutes so the steam continues working on the interior surfaces. The combination of heat and steam softens even stubborn, weeks-old splatter.
Wiping Everything Down
Carefully remove the bowl (it will be hot — use a towel or oven mitt) and take out the turntable plate and its ring or roller assembly. Wipe down the interior walls, ceiling, and floor of the microwave with a damp cloth, starting from the top and working your way down. You’ll find that most residue comes off with almost no resistance.
The turntable plate can be washed in the sink with warm soapy water, or placed in the dishwasher if it’s dishwasher-safe. The roller ring can be wiped down with a damp cloth. Dry everything thoroughly before reassembling, since moisture left inside can cause odor issues of its own.
Wipe the exterior of the microwave — including the door, handle, and control panel — with a damp cloth slightly wrung out. For the control panel in particular, avoid excess moisture that could seep behind buttons.
How to Clean a Microwave with Lemon: A Fresh-Smelling Alternative
If you prefer a citrus scent over the sharp smell of vinegar (though vinegar’s odor dissipates quickly), lemon works beautifully and is equally effective at cutting through grease and neutralizing food odors when you clean a microwave.
Cut a lemon in half and squeeze the juice into a microwave-safe bowl of water, then drop the lemon halves in as well. Microwave on high for three to five minutes, let it stand for two minutes with the door closed, then wipe down the interior exactly as described above. The citric acid in the lemon juice works the same way as acetic acid in vinegar — loosening grime and deodorizing simultaneously.
This method leaves a genuinely pleasant citrus scent in the microwave afterward, which makes it a particularly nice option if you’re cleaning before guests arrive or simply want the kitchen to smell a bit more inviting.
How to Clean a Microwave with Baking Soda for Stubborn Odors
For microwaves that have developed a persistent, embedded odor — the kind that survives multiple steam treatments — baking soda is the most effective tool available. Its natural alkalinity neutralizes the acidic compounds responsible for most food smells rather than simply covering them with fragrance.
Make a paste by mixing two tablespoons of baking soda with a small amount of water until you get a spreadable consistency. Apply it to any particularly odorous or stained spots inside the microwave, let it sit for five to ten minutes, then wipe away with a damp cloth. For a whole-microwave deodorizing treatment, place an open bowl of dry baking soda inside overnight with the door slightly ajar. By morning, it will have absorbed much of the lingering smell.
This method pairs well with the vinegar steam clean — use steam first to loosen physical residue, then follow with a baking soda treatment to address any remaining odors. Together, they make a comprehensive approach to cleaning a microwave that’s seen better days.
Deep Cleaning a Microwave: When a Quick Wipe Isn’t Enough
For microwaves that haven’t been properly cleaned in months — or that have experienced a serious explosion of, say, tomato-based soup or pasta sauce — a standard steam clean may not fully handle the job on its own. This is when a more thorough deep clean approach is warranted.
Tackling Baked-On Food Residue
Start with the steam method to soften as much as possible, then address remaining hardened spots with a paste of baking soda and water applied with a soft sponge. Work in gentle circular motions rather than aggressive scrubbing, which can damage the interior coating. For spots in the corners or around the door seal, an old toothbrush dipped in the cleaning solution gives you the precision needed to get into tight areas without excessive force.
If any spots still resist, dampen a cloth with undiluted white vinegar and lay it directly over the stubborn area for five minutes before wiping again. The sustained contact gives the acid more time to break down the residue.
Cleaning the Door and Seals
The microwave door — particularly its interior glass and the rubber seal around the edge — deserves specific attention during a deep clean. Grease and food particles accumulate in the door’s inner layers and around the seal, where they’re easy to miss during quick wipe-downs.
Use a damp cloth or cotton swab dipped in soapy water to carefully clean along the door seal, removing any trapped debris. For the interior glass of the door, the same vinegar solution used on the walls works perfectly. Wipe dry to prevent streaking.
Don’t Forget the Vent and Exterior Surfaces
The top and sides of the microwave exterior collect grease and kitchen dust over time, especially in kitchens where the microwave sits near the stove. A cloth dampened with warm soapy water handles most of this buildup. The vent openings — typically on the top, back, or sides depending on the model — can be cleaned with a dry brush or a vacuum crevice tool to remove dust that can impede airflow and affect performance.
How Often Should You Clean a Microwave?
The honest answer is: more often than most people do. A quick interior wipe-down after any messy heating job takes less than two minutes and prevents buildup from hardening in the first place. This is by far the easiest way to maintain a clean microwave — catching spills while they’re still fresh rather than letting them petrify into the interior walls over days or weeks.
A full steam clean, as described above, is worth doing once a week if you use your microwave frequently, or every two weeks for more moderate use. A proper deep clean — addressing the door, seals, vents, and any stubborn spots — should happen once a month. This schedule might sound more frequent than you’re used to, but each individual cleaning session is genuinely quick once you make it a habit.
Placing a microwave cover over food before heating is one of the simplest and most impactful things you can do to reduce the frequency with which you need to clean a microwave thoroughly. It takes one extra second and prevents the majority of splatter that makes cleaning necessary in the first place.
Common Mistakes to Avoid When Cleaning a Microwave
Even well-intentioned cleaning efforts can cause problems if the wrong approach is used. One of the most common mistakes is using steel wool or abrasive scrubbers on the interior, which can scratch and eventually damage the protective coating on the walls, compromising both the appearance and the performance of the appliance.
Another frequent error is using bleach or ammonia-based cleaners inside the microwave. These chemicals are effective in many kitchen cleaning applications, but their residue inside a microwave cavity can be genuinely harmful if it gets into food during subsequent heating. Stick to food-safe ingredients — vinegar, lemon, baking soda, and mild dish soap — for interior cleaning.
Finally, people sometimes forget to dry the interior thoroughly after cleaning. A damp microwave interior is a perfect environment for mildew growth, which creates its own set of odor problems. Always follow up any wet cleaning with a dry cloth wipe-down and leave the door open for a few minutes to allow full air drying before the next use.
Cleaning a Microwave Safely: Important Precautions
Safety during microwave cleaning is straightforward but worth stating clearly. Always unplug the microwave before doing any cleaning that involves the exterior, vent areas, or any part of the appliance beyond the immediate interior cavity. For interior cleaning using the steam methods described here, you can leave it plugged in since you’re operating it normally — but unplug before any wiping that approaches the cord, back panel, or vent openings.
Never spray liquid directly onto the control panel, and be careful with moisture around any opening in the exterior casing. Inside the cavity itself, avoid using metal tools or scrapers that could damage the interior or, more seriously, cause arcing during subsequent use.
The U.S. Consumer Product Safety Commission advises that microwave appliances should be inspected periodically for damage to the door seals and latches, since compromised seals can affect safe operation. Cleaning your microwave regularly gives you the opportunity to notice any such damage early.
Conclusion
There’s a real and immediate satisfaction to opening a microwave that smells fresh, looks clean, and has nothing crusty lurking in its corners. More importantly, taking the time to properly clean a microwave on a regular basis contributes to a more hygienic kitchen, better-tasting reheated food, and an appliance that will serve you reliably for years longer than a neglected one.
The methods in this guide — steam cleaning with vinegar or lemon, deodorizing with baking soda, deep cleaning with a targeted paste — are all simple, inexpensive, and genuinely effective. None of them require more than 20 minutes of your time, and most take considerably less. The hardest part is simply building the habit of doing it consistently.
Start today. Whether it’s a full steam treatment or simply wiping down the interior after tonight’s dinner, taking that first step toward keeping your microwave clean makes every subsequent cleaning easier. It’s one of the smallest efforts you can make in your kitchen routine — and one that pays off in freshness, food safety, and peace of mind every single day.
Frequently Asked Questions
Q1: What is the easiest and fastest way to clean a microwave?
The steam method using white vinegar is the fastest and most effective quick-clean option. Fill a microwave-safe bowl with one cup of water and two to three tablespoons of white vinegar, microwave on high for five minutes, then let it sit for two minutes before opening. The steam loosens nearly all food residue so it wipes away effortlessly with a damp cloth. The entire process, including wiping down, takes about 15 minutes and requires no scrubbing.
Q2: How do I get rid of a bad smell in my microwave?
For persistent odors, baking soda is your most reliable solution. Place an open bowl of baking soda inside the microwave overnight with the door slightly ajar — it will absorb embedded food smells by morning. For immediate odor treatment, the lemon steam method works well: heat water with fresh lemon juice and lemon halves for three to five minutes, let it sit, then wipe down. The citric acid neutralizes odor-causing compounds and leaves a fresh scent behind.
Q3: Can I use dish soap to clean the inside of a microwave?
Yes, mild dish soap diluted in warm water is perfectly safe for cleaning the interior of a microwave. Apply it with a damp sponge or cloth, wipe thoroughly, then follow with a clean damp cloth to remove any soap residue, and dry with a towel. Avoid letting soapy water drip into any openings or vents. Dish soap is especially useful for cleaning the turntable plate and the roller ring, which can be washed in the sink just like regular dishes.
Q4: How do I clean a microwave without vinegar?
Lemon juice is the best direct substitute for vinegar in the steam cleaning method — it works by the same acid-based principle and smells considerably more pleasant. Alternatively, a tablespoon of dish soap added to a bowl of water, heated until steaming, creates a soapy steam that loosens grease and food residue effectively. Baking soda paste applied directly to stained areas is another vinegar-free option that handles both stains and odors without any smell at all.
Q5: Is it safe to clean a microwave with bleach?
No, bleach should not be used inside a microwave. Bleach residue is difficult to remove completely from porous interior surfaces, and any that remains can transfer to food during subsequent heating — a genuine food safety concern. Bleach fumes inside a confined microwave cavity can also be irritating if inhaled. Stick to food-safe cleaning agents: white vinegar, lemon juice, baking soda, and mild dish soap are all effective and completely safe for microwave interior use.