Introduction
Pull open the oven door right now and take an honest look. If what greets you is a mosaic of burnt drips, grease splatters, and the blackened memory of a casserole dish that overflowed six months ago, you’re far from alone. The oven is arguably the hardest-working appliance in the kitchen — and, not coincidentally, one of the most neglected when it comes to cleaning.
Learning how to clean an oven thoroughly is one of those household skills that pays dividends in ways most people don’t anticipate. A clean oven heats more evenly, operates more efficiently, and produces food that actually tastes like what you intended to cook — not faintly smoked with last week’s drippings. Beyond performance, there’s a genuine safety dimension: accumulated grease and carbonized food debris inside an oven can ignite, especially at higher temperatures, creating a fire hazard that builds slowly and invisibly until it isn’t.
The good news is that you don’t need harsh commercial chemicals or a professional service to clean an oven properly. Whether you prefer entirely natural methods, the built-in self-cleaning function, or a hybrid approach for tough situations, this guide covers every technique worth knowing — along with the tips that make each one work as well as possible.
Why Your Oven Gets So Dirty
Every time you roast, bake, or broil, small amounts of grease, oil, and food particles splatter onto the oven walls, floor, and ceiling. At cooking temperatures, these deposits don’t simply dry — they cook, gradually carbonizing into a hard, dark layer that bonds chemically with the oven’s interior surfaces. Over time, layer builds on layer, and what started as a light residue becomes a thick, baked-on crust that resists casual wiping.
This accumulation affects your cooking in more ways than one. Heavy grease deposits absorb heat unevenly, causing hot spots that can scorch food on one side while leaving it underdone on the other. They also release smoke and unpleasant odors during cooking, which transfer directly to whatever you’re baking or roasting. If you’ve ever wondered why your oven smokes even at moderate temperatures, or why your cookies smell faintly of last Sunday’s roast chicken, the answer is almost certainly a buildup of old grease and residue that needs cleaning.
According to the National Fire Protection Association, cooking equipment is the leading cause of home fires — and failure to clean cooking appliances is among the primary contributing factors. Regular oven cleaning, even just a thorough wipe-down every month or two, meaningfully reduces this risk.
What You’ll Need to Clean an Oven at Home
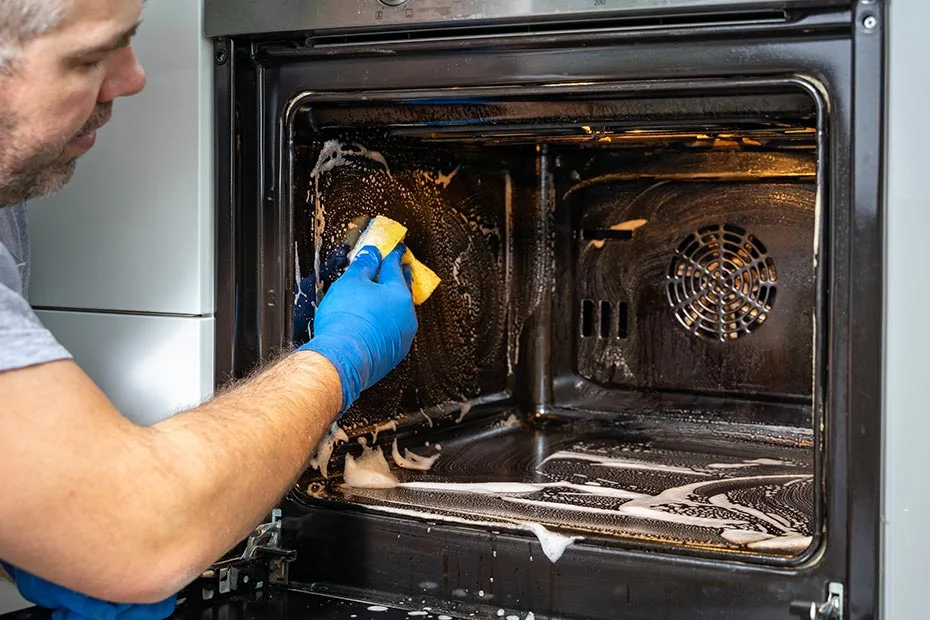
The most effective oven cleaning methods rely almost entirely on ingredients you already have at home. For natural cleaning, white vinegar, baking soda, dish soap, warm water, and a spray bottle are the core supplies. You’ll also want rubber gloves to protect your hands from cleaning solution contact, a sponge or soft scrub brush, microfiber cloths or old rags, and a plastic scraper or old credit card for lifting loosened deposits without scratching the enamel.
For particularly stubborn areas, a paste made from baking soda and water is the single most effective natural cleaning agent available for baked-on oven grease. It’s alkaline chemistry breaks down the acidic carbon compounds that make burnt food so difficult to remove, doing much of the heavy lifting so you don’t have to scrub as hard.
If you choose to use a commercial oven cleaner, look for one that specifies it’s safe for continuous clean or self-clean oven interiors, and always follow the manufacturer’s ventilation instructions — many commercial cleaners contain lye or other caustic compounds that require careful handling.
How to Clean an Oven Naturally with Baking Soda and Vinegar
This is the method that earns the most consistent praise from people who’ve tried it — effective, inexpensive, non-toxic, and genuinely satisfying to watch work. It does require a bit of patience, as the baking soda paste needs time to do its job, but the actual effort involved is minimal.
Preparing the Oven and Making the Paste
Start by removing the oven racks completely and setting them aside — they’ll be cleaned separately. Remove any loose debris or crumbs from the oven floor, either by hand or with a dry cloth. This prevents you from working wet paste into loose material that just spreads around.
Mix half a cup of baking soda with enough water to form a thick, spreadable paste — roughly the consistency of Greek yogurt. You can add a few drops of dish soap to the mixture for additional grease-cutting power, though the baking soda alone is highly effective.
Applying and Waiting
Using a rubber-gloved hand or a pastry brush, spread the baking soda paste over every interior surface of the oven — the walls, ceiling, floor, and the interior of the door. Pay extra attention to areas with heavy buildup, applying a thicker layer there. Avoid the heating elements (the metal coils in electric ovans) and the gas ports in gas ovens.
Here is where patience becomes your most important tool: leave the paste on for at least 12 hours, or overnight if possible. The longer it sits, the more thoroughly it penetrates and loosens the baked-on grease and carbon deposits. By morning, the paste will have darkened considerably as it absorbs the grime — this is exactly what you want to see.
Wiping Away and the Vinegar Finish
Using a damp cloth or sponge, wipe out as much of the baking soda paste as you can. A plastic scraper is invaluable here for loosening any areas where the paste has hardened along with the grime underneath it. Work systematically from top to bottom so that debris falls to the oven floor where it’s easy to collect.
Once you’ve removed the bulk of the paste, fill a spray bottle with white vinegar and spray the entire interior. The vinegar reacts with any remaining baking soda residue, producing a gentle fizzing action that lifts the last traces of grime and makes them easy to wipe away. Wipe down with a clean damp cloth until the interior is smooth and residue-free. The result, even after a single treatment of badly neglected ovans, is genuinely impressive.
How to Clean Oven Racks
The oven racks are often the most intimidating part of the job — they’re covered in the same baked-on grease as the oven interior, but their shape makes them harder to clean with paste and a cloth. Fortunately, there are a couple of approaches that make cleaning oven racks far less laborious than it first appears.
The Bathtub Soak Method
This is the most effective method for heavily soiled racks. Line your bathtub with old towels to protect the enamel surface, lay the racks flat, and fill the tub with enough hot water to submerge them. Add half a cup of dish soap and half a cup of white vinegar, and leave the racks to soak overnight. By morning, the baked-on grease will have softened significantly and can be scrubbed away with a non-scratch scouring pad with relatively little effort.
Rinse the racks thoroughly and dry them before returning them to the oven. Leaving them wet can cause rust to form on some rack materials.
The Baking Soda Paste Method for Racks
If the bathtub soak isn’t practical, the same baking soda paste used for the oven interior works on racks as well. Lay them on old newspapers or a plastic sheet, apply the paste generously, let it sit for several hours, then scrub with a stiff brush and rinse well. This method requires more scrubbing than the soak but works well for moderately soiled racks.
Using the Self-Clean Function: What You Should Know
Most modern ovens include a self-cleaning function that uses extremely high temperatures — typically between 800°F and 900°F (425°C to 480°C) — to incinerate food residue inside the oven, reducing it to a fine ash that can simply be wiped away afterward. It sounds almost too easy, and in some respects it is — but there are important things to know before you use it.
First, remove the oven racks before running the self-clean cycle. The extreme heat can warp or discolor the metal, and the coating on some racks can be damaged. Remove any large pieces of loose debris or foil from the ovan floor as well, since these can produce heavy smoke or flare up during the cycle.
The self-clean cycle typically runs for two to six hours depending on the oven model and soil level, and the oven will be extremely hot throughout — and will remain hot for a significant period afterward. The process produces smoke and some fumes, which means proper ventilation is essential: open windows, run exhaust fans, and consider removing pets from the area during and immediately after the cycle, since birds in particular are highly sensitive to fumes.
Once the oven has cooled completely, wipe away the white ash residue with a damp cloth. The interior should be noticeably cleaner, though a final wipe with a vinegar-dampened cloth removes any remaining film and leaves surfaces looking bright.
It’s worth noting that frequent use of the self-clean function is generally not recommended by appliance manufacturers. The extreme heat puts considerable stress on the oven’s components — particularly door seals, thermal fuses, and electronic control boards — and repeated use can shorten the appliance’s lifespan. Using it once or twice a year, supplementing with manual cleaning between cycles, is a reasonable balance.
How to Clean an Oven Door: Inside and Out
The oven door deserves special attention because it has multiple layers — the exterior glass, the interior glass, and in many models, a gap between glass panels where grease and moisture can accumulate and create foggy, discolored streaking that ordinary cleaning can’t reach.
For the exterior door surface and the single-layer glass found on the interior of most oven doors, the baking soda paste method works perfectly. Apply, leave for 20 to 30 minutes, then wipe clean and follow with a vinegar spray for streak-free glass.
For the space between the door’s inner and outer glass panels — that frustrating fogged gap that makes the oven look perpetually dirty even when everything else is clean — many ovans allow the door to be disassembled following instructions in the owner’s manual. Doing so allows you to clean between the glass panels properly. If disassembly isn’t an option, a thin flexible cloth or even a repurposed windshield wiper insert threaded carefully through any existing gap can remove some of the interior buildup.
Cleaning the Oven Stovetop and Burners
While not strictly part of the oven cavity itself, the stovetop, burner grates, and drip pans are closely connected to the overall process of keeping your cooking appliance clean — and they benefit from being addressed at the same time.
Gas burner grates can be soaked in hot soapy water for 30 minutes and scrubbed with a stiff brush; severely clogged burner ports can be cleared with a toothpick or straightened paperclip after soaking. Electric stovetop coils can be removed and wiped down with a damp soapy cloth once cooled, and drip pans benefit from the same baking soda paste treatment used on the oven interior.
Glass or ceramic stovetops require a specifically gentle approach — a dedicated ceramic stovetop cleaner or a very fine non-scratch pad prevents the micro-scratches that dull the surface over time. Always allow the surface to cool completely before cleaning.
How Often Should You Clean an Oven?
The most honest answer is that the cleaning schedule that works best is the one you’ll actually stick to. That said, some general guidelines are worth knowing.
A light wipe-down of spills and splatter after each use — or at least after any meal that involved roasting or high-temperature cooking — prevents residue from hardening and accumulating. This takes two minutes and dramatically reduces the scale of deeper cleaning required later.
A moderate cleaning using the baking soda and vinegar method is worth doing every one to three months for ovens in regular use. Households that cook frequently or use the oven for high-fat roasting may find monthly cleaning keeps things manageable, while lighter users can stretch to quarterly without issues.
A full deep clean — including racks, the door, and all surfaces — should happen at least twice a year. Many people align this with seasonal transitions, giving the ovan a thorough clean in spring and again in autumn before the heavier cooking season begins.
Mistakes to Avoid When Cleaning an Oven
Even experienced home cooks sometimes make cleaning errors that either reduce effectiveness or cause unintended damage. Using steel wool or highly abrasive scrubbers on the oven’s enamel interior is one of the most common — it scratches the surface in ways that actually make future cleaning harder, since grime embeds more readily in a roughed-up surface.
Another frequent mistake is applying commercial oven cleaner to the heating elements in an electric oven or the gas ports in a gas oven. These components can be damaged by chemical contact, and residue left on heating elements produces smoke and odors during use that can affect food flavor. Always mask off or carefully avoid these areas when applying any cleaning solution.
Finally, many people run the self-clean cycle without removing the racks first, not realizing that the extreme heat can permanently affect the racks’ appearance, finish, and even their ability to slide smoothly. Take the extra 60 seconds to pull them out — it’s worth it every time.
Conclusion
Every meal you cook comes out better from a clean oven. The heat distributes more evenly, the flavors stay pure, the smoke stays away, and the simple act of opening the oven door becomes something other than a reminder of neglected maintenance. Taking the time to properly clean an oven — whether with the natural baking soda and vinegar approach, the self-cleaning function, or a combination of both — is one of the highest-return investments you can make in the quality of your cooking and the longevity of your appliance.
The methods in this guide work. They’re accessible, affordable, and proven across every type of oven and every level of mess. Whether you’re dealing with a lightly soiled ovan that just needs a refresh or a deeply neglected cavity that hasn’t seen a proper clean in years, the right approach exists — and now you know exactly what it is.
Start with the baking soda paste tonight if your oven needs it. Leave it overnight. Wake up tomorrow and wipe it clean. It will take less than 20 minutes of active effort, and the result will be an oven that performs better, lasts longer, and makes every cooking session more enjoyable.
Frequently Asked Questions
Q1: What is the best natural way to clean an oven?
The baking soda and vinegar method is widely regarded as the most effective natural approach. Mix baking soda with water to form a thick paste, coat all interior surfaces of the oven, and leave it overnight — at least 12 hours. Wipe away the paste with a damp cloth, then spray white vinegar over the interior to react with any residual baking soda and lift remaining grime. The result is a clean, grease-free oven interior with no harsh chemicals involved. This method is safe, inexpensive, and remarkably effective even on very heavily soiled ovens.
Q2: How long does it take to clean an oven properly?
Active effort time for a manual deep clean is typically 20 to 30 minutes — applying the paste, wiping it away the next day, cleaning the racks, and finishing the door. However, the total elapsed time including the overnight paste soak is closer to 12 to 14 hours. The self-cleaning cycle runs for two to six hours but requires almost no effort from you. A quick maintenance wipe after cooking takes two to five minutes. The method you choose largely determines the time commitment rather than the thoroughness of the result.
Q3: Is it safe to use the oven’s self-clean function?
Yes, with proper precautions. Remove oven racks before running the cycle, ventilate the kitchen well by opening windows and running fans, and keep pets — especially birds — out of the area during and after the cycle due to fumes produced. Don’t leave the house or go to sleep while the self-clean cycle is running, and allow the oven to cool completely before wiping out the ash residue. Used sensibly once or twice a year, the self-clean function is a safe and convenient way to handle heavy oven buildup.
Q4: How do I clean an oven without baking soda?
Lemon juice is a reasonable substitute — its citric acid helps cut through grease, though it’s somewhat less powerful than baking soda on heavily carbonized deposits. Diluted dish soap applied with a damp sponge handles moderate buildup when left to soak for 20 to 30 minutes before wiping. Commercial oven cleaners are another option; they typically work faster than natural methods on very heavy grease but require careful ventilation and should not be used on heating elements or gas components. For very light cleaning, a damp microfiber cloth alone handles fresh spills effectively.
Q5: How do I get rid of burning smell from oven after cleaning?
A burning smell after cleaning is most commonly caused by baking soda or cleaning product residue remaining on the oven surfaces or heating elements. To eliminate it, wipe the entire interior again with a clean damp cloth to remove any lingering residue, then heat the oven to 200°C (400°F) for 15 to 20 minutes with the kitchen well ventilated — this burns off any trace residue safely. Placing a bowl of water with a few lemon slices in the oven during this process helps neutralize lingering chemical smells. If the odor persists after several cycles, check that no cleaning product has contacted the heating elements directly.