
Introduction
There is something quietly powerful about a well-knotted tie. It signals effort, attention to detail, and a certain command of personal presentation that no casual outfit can fully replicate. Yet for many people — whether they are dressing for their first job interview, a wedding, or a formal dinner — the simple question of how to tie a tie can feel surprisingly intimidating.
The truth is, learning how to tie a tie is one of those skills that looks complicated from the outside but becomes second nature the moment you understand the underlying logic. Once you’ve worked through the mechanics a few times in front of a mirror, your hands begin to remember the sequence on their own.
This guide is designed to walk you through every major knot style with clarity and confidence. You’ll learn not just the steps, but the reasoning behind each knot — which occasions call for which style, how your tie fabric affects the outcome, and the small finishing details that separate a polished knot from a sloppy one. Whether you are a complete beginner or someone who wants to refine their technique, this is the most thorough resource you’ll find on how to tie a tie.
The Basics Before You Begin: Tie Length, Fabric, and Starting Position
Before you attempt any specific knot, getting a few fundamentals right will make the entire process smoother. The most common frustration people have when learning how to tie a tie is ending up with a knot that sits too high, too low, or produces a tip that hangs past the belt buckle. These problems almost always trace back to starting position and tie length.
A standard tie is typically around 57 to 58 inches long, which is designed to work for an average adult male of around 5’10” in height. If you are taller or shorter, specialty length ties are widely available. When you drape the tie around your collar, the wider end — called the apron or blade — should hang significantly lower than the narrow end, typically about 12 inches lower. This offset is what gives you the material you need to form the knot and still end up with the tip grazing the top of your belt buckle.
The fabric of your tie matters too. Thick wool or tweed ties produce fuller, more textured knots. Lightweight silk ties are more fluid and better suited to tighter, neater knots. When you are learning how to tie a tie for the first time, a medium-weight polyester or blended fabric practice tie is ideal — it is forgiving, holds its shape well, and won’t show wear from repeated attempts.
Always start with your collar up and the top button fastened. Drape the tie under the collar so that it sits centered, then flip the collar down over the tie once the knot is complete. This sequence keeps the knot snug against the collar button naturally.
How to Tie a Tie: The Four-in-Hand Knot
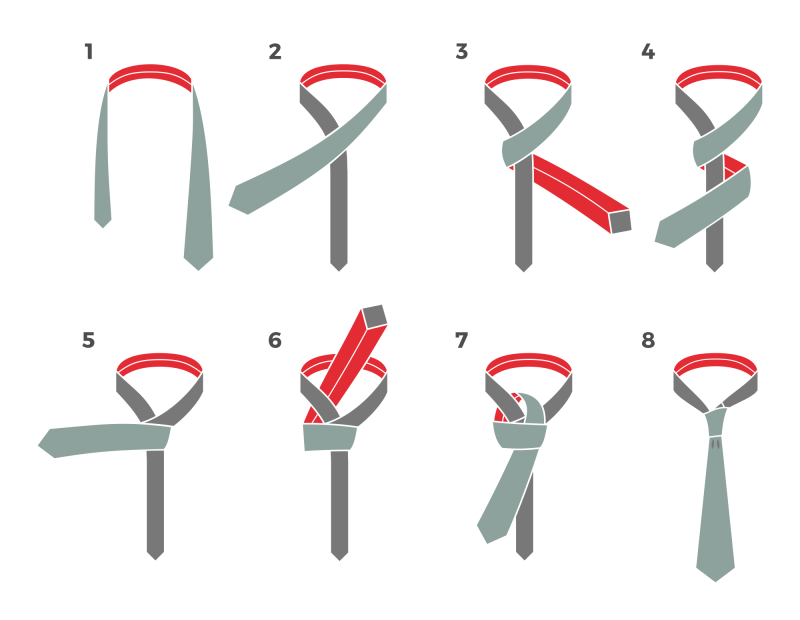
The Four-in-Hand is the most widely used tie knot in the world, and for good reason. It is asymmetrical by design, producing a slightly elongated, tapered shape that works beautifully with a wide range of collar types — particularly the classic point collar and the button-down collar. If you are learning how to tie a tie for the very first time, this is the knot to start with.
Step-by-Step: The Four-in-Hand
Begin with the wide end on your right and the narrow end on your left. Cross the wide end over the narrow end, bringing it horizontally across. Then wrap the wide end underneath the narrow end from right to left. Bring the wide end back over the narrow end from left to right. Now push the wide end upward through the loop that has formed around your neck. Slide the wide end down through the horizontal band you created across the front of the knot. Tighten by holding the narrow end and sliding the knot gently upward toward your collar.
The finished knot should be snug but not strangling. It should have a slight dimple — a small indentation just below the knot’s base — which you can form by pressing your finger into the fabric as you tighten. That dimple is the mark of someone who truly knows how to tie a tie with intention.
The Half Windsor: Symmetry Without the Bulk
Once you are comfortable with the Four-in-Hand, the Half Windsor is the natural next step. It produces a triangular, symmetrical knot that is larger than the Four-in-Hand but smaller than the Full Windsor. It strikes an ideal balance for most professional environments and works particularly well with spread collars that have a wider opening between the collar points.
Step-by-Step: The Half Windsor
Start again with the wide end on your right and the narrow end on your left, but this time position the wide end about 12 inches lower than usual, as the Half Windsor consumes more length. Cross the wide end over the narrow end. Bring the wide end up through the neck loop from underneath. Bring the wide end down to the left, then pass it behind the narrow end toward the right. Bring the wide end over the front of the knot horizontally, from right to left. Push the wide end up through the neck loop again. Guide it down through the horizontal front band. Tighten and center the knot.
Practicing this in front of a mirror is important because the Half Windsor involves more passes than the Four-in-Hand, and it is easy to lose track of your orientation mid-knot. Once you have it memorized, though, it becomes one of the most reliable and versatile knots in your repertoire for anyone who takes how to tie a tie seriously.
The Full Windsor: The Power Knot
The Full Windsor — sometimes called the Double Windsor — is the largest and most formal of the classic tie knots. It produces a wide, thick, perfectly symmetrical triangle that commands presence. It was historically associated with the Duke of Windsor, who favored a particularly substantial knot, though historical accounts suggest he actually used specially made thick ties rather than a more complex knot to achieve the effect.
Regardless of origin, the Full Windsor is the go-to choice for job interviews at formal institutions, black-tie adjacent events, and any occasion where you want your appearance to project authority and polish.
Step-by-Step: The Full Windsor
The Full Windsor requires significantly more length from the wide end — start with it roughly 14 inches below the narrow end. Cross the wide end over the narrow end. Bring the wide end up through the neck loop and down to the left. Pass the wide end behind the narrow end toward the right. Bring the wide end up through the neck loop from the front and let it fall to the right. Pass the wide end horizontally across the front of the knot from right to left. Bring the wide end up through the neck loop one more time. Guide it down through the horizontal band on the front. Tighten carefully, centering the knot as you go.
The Full Windsor takes patience to master, but once you can do it consistently, you will understand why it remains the benchmark for anyone who wants to demonstrate mastery of how to tie a tie at a formal level.
The Pratt (Shelby) Knot: The Underrated Choice
The Pratt knot, also known as the Shelby knot, is one of the most underappreciated techniques in the world of tie-tying. It produces a medium-sized, neat, symmetrical knot that is smaller than a Windsor but more structured than a Four-in-Hand. Its defining quirk is that it begins with the tie inside-out — the seam facing outward — which is unconventional but produces an impressively tidy result.
If you work in a business-casual environment and want a knot that looks crisper than the Four-in-Hand without the bulk of a Windsor, the Pratt is your answer. It is also a good choice for ties made from heavier fabrics, as the construction method prevents the knot from becoming overly thick.
Learning the Pratt is a great way to expand your practical toolkit once you have the foundational knots down. It proves that knowing how to tie a tie well means knowing that not every situation calls for the same knot.
The Bow Tie: A Different Kind of Mastery
No comprehensive guide on how to tie a tie would be complete without addressing the bow tie. Pre-tied bow ties exist, of course, but there is an unspoken regard in formal circles for the hand-tied bow — its slight asymmetry and soft edges signal authenticity in a way that a clipped-on version simply cannot.
How to Tie a Bow Tie
Drape the bow tie around your collar with one end hanging about an inch and a half lower than the other. Cross the longer end over the shorter end and pull it through the neck loop, just as you would begin tying a shoe. Fold the shorter end horizontally to form the front bow shape. Drop the longer end over the center of that fold. Fold the longer end and push it through the loop that sits behind the front bow. Tighten by pulling the folded ends gently in opposite directions and adjusting the symmetry.
The bow tie will look slightly imperfect — and that is correct. A perfectly symmetrical machine-like bow tie is almost certainly pre-tied. The gentle irregularity of a hand-tied bow tie is a quiet mark of distinction that formal dress connoisseurs universally appreciate.
Common Mistakes That Ruin a Good Knot
Even after learning how to tie a tie correctly, small errors in execution can undermine an otherwise sharp look. The most frequent mistake is pulling the knot too tight before centering it, which causes it to sit off-center and creates an asymmetrical, sloppy impression.
Another common error is ignoring the dimple. A dimple — that small, deliberate crease just below the base of the knot — is not accidental. It adds depth and dimension to the knot and is a hallmark of someone who learned how to tie a tie with attention to finish. To form one, simply press your index finger gently into the wide end of the tie as you tighten the knot upward.
Tip length is the third most common issue. The tip of your tie should reach the top of your belt buckle — not above it, not hanging past it. If you consistently run long or short, adjust your starting position accordingly. A tie bar worn at the third or fourth shirt button is both functional and stylish, holding the tie in place while adding a refined accessory detail.
Choosing the Right Knot for the Right Occasion
Understanding how to tie a tie also means understanding that knot choice is a form of contextual dressing. A Four-in-Hand is perfectly appropriate for everyday professional wear and casual semi-formal events. A Half Windsor elevates business attire and works well at weddings or dinners. The Full Windsor is reserved for the most formal occasions — presentations, important interviews, and black-tie events. The bow tie occupies its own lane: evening formal, academic, and creative professional settings.
The collar of your shirt should also guide your knot choice. Narrow point collars pair well with smaller knots. Wide spread collars leave a visible gap that looks best filled by a larger, triangular Windsor knot. Button-down collars are inherently casual and suit the Four-in-Hand naturally.
According to style guidance from GQ Magazine, matching your knot to your collar is just as important as matching your tie color to your outfit — it is a detail that distinguishes the thoughtfully dressed from those who simply put on a tie.
Caring for Your Tie to Keep Every Knot Looking Sharp
Your ability to tie a great knot is only as good as the condition of the tie itself. A creased, wrinkled, or misshapen tie will not produce a clean knot no matter how careful your technique. Knowing how to tie a tie properly includes knowing how to maintain the fabric between wears.
Never leave a tie knotted when not in use. After wearing, untie the knot in reverse — following the steps backward — rather than simply pulling it loose, which stresses the fabric. Roll the tie loosely and store it flat or hanging on a dedicated tie rack. Most wrinkles can be removed by hanging the tie in a steamy bathroom overnight rather than ironing, which can flatten the texture and leave sheen marks on delicate silk.
The Textile Care Alliance recommends dry cleaning for high-quality silk ties and avoiding spot treatments with water, which can leave rings on fine fabrics. Treating your ties well means every knot you form on a well-kept tie will sit as cleanly and proudly as the day you learned the technique.
Conclusion
There is a quiet confidence that comes from standing in front of a mirror, forming a knot with smooth, practiced ease, and knowing that when you walk out the door, your tie is exactly where it should be. Learning how to tie a tie is not just about dressing well — it is about the discipline and attention that good dressing represents.
Start with the Four-in-Hand. Practice it until it is automatic. Then graduate to the Half Windsor and Full Windsor as occasions demand. Explore the Pratt and the bow tie when you want to add range to your repertoire. Pay attention to starting length, fabric weight, collar type, and the finishing dimple. These details, small as they seem individually, add up to a look that is genuinely polished rather than merely dressed.
Every formal or semi-formal occasion you encounter from this point forward is an opportunity to bring that level of care and craft to how you present yourself. And it all starts with mastering how to tie a tie.
Frequently Asked Questions About How to Tie a Tie
What is the easiest tie knot for a beginner?
The Four-in-Hand knot is universally recommended for beginners. It requires the fewest steps, works with almost every collar and tie fabric, and produces a clean, slightly asymmetrical knot that looks natural and stylish. Once you’ve practiced it five or six times, the muscle memory sets in and you can complete it in under a minute.
How long should a tie be when properly knotted?
The standard guideline is that the tip of your tie — the pointed end of the wider blade — should reach the top of your belt buckle when the knot is properly tightened and centered at your collar. Going slightly above or below by half an inch is acceptable, but the tip should never hang below the buckle or rest significantly above the waistband.
Does the type of tie fabric affect how to tie a tie?
Yes, significantly. Lightweight silk ties are fluid and best suited to smaller, tighter knots like the Four-in-Hand or Pratt. Heavier wool, tweed, or knitted ties produce bulkier knots and are better served by simpler constructions. If a knot looks too thick or lumpy with a particular tie, the fabric is likely too heavy for that knot style — switch to a simpler technique.
How do I get a dimple in my tie knot?
As you tighten the knot upward toward your collar, press your index finger firmly into the center of the wide end just below the knot base. Hold that indentation in place with your finger while using your other hand to slide the knot upward into position. Remove your finger once the knot is snug. With practice, forming a clean dimple becomes automatic and takes only a few extra seconds.
Can I learn how to tie a tie without a mirror?
Technically yes, but a mirror makes the learning process dramatically faster. Being able to see the knot forming from the front — the perspective other people see — helps you identify errors in symmetry and placement immediately. Once you have the knot fully memorized through muscle memory, you can tie it without a mirror reliably. Until that point, practicing in front of a full-length or bathroom mirror is strongly recommended.