
Introduction
Whether you are saving an important email, capturing a funny moment from a video call, or documenting a web page for research, knowing how to take a screenshot on Chromebook is one of the most practical skills you can have as a Chrome OS user. It is the kind of thing you reach for constantly once you know it is there — and yet surprisingly, many Chromebook users go weeks or months without realizing just how many screenshot options are available to them.
Unlike Windows or macOS, Chrome OS has its own unique keyboard layout and a dedicated screenshot toolkit that is tightly built into the operating system. The approach is slightly different from what you might be used to on other platforms, but once you understand the system, taking a screenshot on Chromebook becomes fast, intuitive, and remarkably versatile.
This guide covers every method available — from simple full-screen captures to precise partial screenshots, from tablet-mode shortcuts to the built-in Screen Capture toolbar. By the end, you will have a complete picture of your options and the confidence to use the right tool for every situation.
Understanding Chrome OS Before You Take a Screenshot on Chromebook
Before diving into specific methods, it helps to understand a few things about how Chrome OS handles screenshots differently from other operating systems. Chrome OS is a lightweight, browser-centric operating system developed by Google, and it stores screenshots locally in the Downloads folder by default — though that default location can be changed.
When you take a screenshot on Chromebook, the file is saved as a PNG image. A small notification appears in the bottom-right corner of the screen, giving you the option to immediately view the image, copy it to your clipboard, or open the folder where it was saved. This notification window is easy to miss if you are not looking for it, but it is a helpful quick-access point that saves you from hunting through your file manager.
It is also worth knowing that Chromebooks come in several form factors. Some are traditional clamshell laptops, some are convertible 2-in-1 devices that fold into tablet mode, and some are detachable tablets. Each form factor has slightly different screenshot mechanics, particularly for tablet mode, and this guide addresses all of them. Knowing your device type will help you choose the right approach when taking a screenshot on Chromebook in different situations.
The Fastest Way: Keyboard Shortcut for a Full-Screen Screenshot on Chromebook
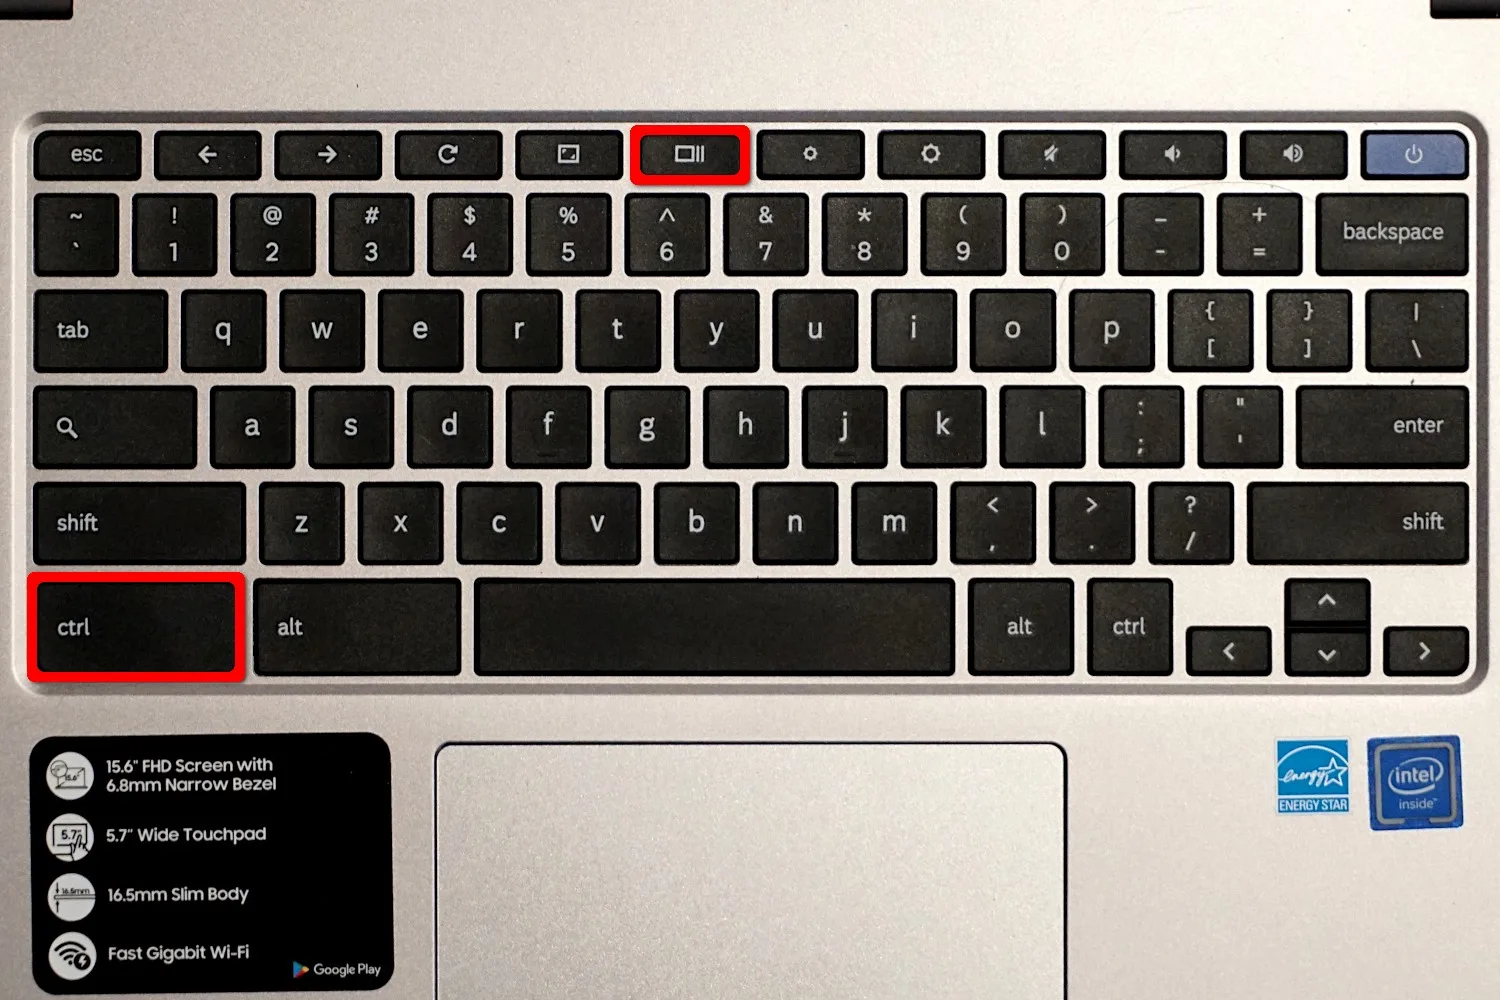
The quickest and most commonly used method to take a screenshot on Chromebook is a simple keyboard shortcut. For a full-screen capture — meaning everything visible on your display at that moment — press the Ctrl key combined with the Show Windows key. The Show Windows key looks like a rectangle with two vertical lines on its right side, typically found in the top row of a Chromebook keyboard where the F5 key would be on a standard keyboard.
When you press this combination, the entire screen is captured instantly. The screenshot is saved to your Downloads folder, and that small notification popup appears in the lower-right corner of the screen. Clicking the notification takes you directly to the saved image so you can view or share it right away.
This shortcut is ideal for situations where speed matters — you need to capture something quickly before it disappears, or you simply want to document the full state of your screen without fussing with selection tools. For most casual screenshot needs, this keyboard shortcut for a full-screen screenshot on Chromebook is the method you will reach for most often.
How to Take a Partial Screenshot on Chromebook
Full-screen captures are great, but there are plenty of times when you only need a specific portion of what is on screen — a particular image, a block of text, a chart, or a section of a webpage. This is where partial screenshot functionality becomes invaluable, and Chrome OS handles it elegantly.
Using Ctrl + Shift + Show Windows
To take a partial screenshot on Chromebook, press Ctrl + Shift + Show Windows simultaneously. Rather than immediately capturing the screen, this shortcut shifts the cursor into a crosshair selection mode. Click and drag across the area of the screen you want to capture, then release. Chrome OS will immediately save the selected region as a PNG screenshot.
This method gives you precise control over what gets captured. If you are documenting a specific error message, cropping out distracting elements, or isolating a piece of content to share with someone, the partial screenshot shortcut is the right tool. It is worth practicing the click-and-drag motion a few times because the selection area appears as a blue highlighted rectangle — taking a moment to align it carefully before releasing produces much cleaner results.
Adjusting and Cancelling a Selection
While you have a region selected, you can adjust the corners before confirming the capture. If you change your mind entirely, pressing the Escape key cancels the selection without saving anything. This is a helpful safety valve when you start a selection in the wrong place — no need to undo or delete a mistaken screenshot.
The Screen Capture Toolbar: The Most Powerful Way to Screenshot on Chromebook
Chrome OS includes a dedicated Screen Capture toolbar that most users never discover, yet it is arguably the most powerful and flexible way to take a screenshot on Chromebook. This toolbar consolidates all screenshot and screen recording options into a single, visually intuitive interface.
Opening the Screen Capture Toolbar
To open it, press Ctrl + Shift + Show Windows — the same shortcut used for partial screenshots. Alternatively, you can access it through the Quick Settings panel by clicking the clock in the bottom-right corner, then selecting “Screen capture” from the icons that appear.
Once open, the toolbar appears at the bottom of your screen with several icon options. You can choose between full-screen screenshot, partial screenshot, and window screenshot — all accessible with a single click rather than memorizing separate shortcuts.
Window Screenshot Mode
The window screenshot mode is particularly useful and often overlooked. In this mode, clicking on any open window captures just that window — no background, no taskbar, no adjacent windows. If you want to share a screenshot of a specific application or document without revealing anything else on your screen, this is the cleanest way to do it.
Screen Recording From the Same Toolbar
The Screen Capture toolbar also offers screen recording options — both full-screen and partial recording — which are entirely separate from screenshot functionality but worth knowing about. If you need to document a process, create a tutorial, or capture something that requires motion, you can switch from screenshot mode to video recording mode without leaving the toolbar. This makes the Screen Capture toolbar a genuinely comprehensive screen documentation tool, not just a place to take a screenshot on Chromebook.
Taking a Screenshot on Chromebook in Tablet Mode
If you are using a Chromebook in tablet mode — either a convertible device folded all the way back or a detachable tablet — the keyboard shortcuts are not available while the keyboard is detached or disabled. Chrome OS accounts for this with a hardware-based alternative.
The Power + Volume Down Method
To take a screenshot on Chromebook while in tablet mode, simultaneously press the Power button and the Volume Down button. Hold them together for about one second, then release. The screen will briefly flash white, and the screenshot notification will appear in the corner of the display just as it does with keyboard shortcuts.
This method captures the entire screen. While you cannot easily take a partial screenshot in tablet mode using hardware buttons alone, you can switch back to laptop mode if your device supports it and use the keyboard shortcuts for more precise capture options. Some stylus-equipped Chromebooks also offer stylus-specific screenshot shortcuts accessible from the stylus tools menu in the system tray, which is worth exploring if your device includes a stylus.
Where Does a Screenshot on Chromebook Get Saved?
One of the most common follow-up questions after learning how to capture the screen is finding out where the files actually go. By default, every screenshot on Chromebook is saved to the Downloads folder. You can access it by opening the Files app — the folder icon in your app shelf or launcher — and navigating to Downloads.
Screenshots are named with a timestamp format: “Screenshot [date] at [time].png,” which makes it easy to identify recent captures. If you take many screenshots regularly, this naming convention keeps them organized chronologically without any manual effort.
Changing the Default Save Location
If you prefer your screenshots to land somewhere other than Downloads — perhaps a dedicated “Screenshots” folder in Google Drive for easy cloud access — you can adjust this through the Screen Capture toolbar settings. Click the gear icon within the toolbar and you will find an option to change the save location. Saving directly to Google Drive is particularly useful if you frequently share screenshots with collaborators or want them backed up automatically, since files in Downloads are stored locally and are not synced to Google Drive by default.
According to Google’s official Chrome OS support documentation, the Screen Capture toolbar was introduced as part of Chrome OS 89 and has received updates in subsequent versions — so if you are running an older version of Chrome OS, some toolbar features may not be available until you update your device.
Using Google Photos and Third-Party Tools for Advanced Screenshot Editing
Taking the screenshot is only half the story for many users. Once the image is captured, you may want to annotate it, crop it further, add arrows or text, or share it directly. Chrome OS offers several paths here that are worth knowing about.
The built-in Gallery app can open any screenshot immediately and provides basic editing tools including crop, rotate, brightness, and contrast adjustments. For quick, light edits, it is perfectly sufficient without installing anything extra.
For more advanced annotation — drawing arrows, adding text labels, highlighting sections, or blurring sensitive information — the Markup tool built into Chrome OS allows you to annotate screenshots directly before saving or sharing. It is accessible from the Gallery app’s toolbar.
If you need even more capability, extensions from the Chrome Web Store like Lightshot, Nimbus Screenshot, or Awesome Screenshot add scrolling screenshot functionality — the ability to capture an entire webpage even if it extends below the visible window area — which is something Chrome OS does not offer natively. These tools are widely used by researchers, content creators, and professionals who regularly need to document full-page web content and want more than the standard screenshot on Chromebook options provide.
Tips and Tricks to Get More From Every Screenshot on Chromebook
A few small habits can make your screenshot workflow noticeably more efficient over time. First, always check the notification popup that appears after each capture. It gives you one-tap access to copy the image directly to your clipboard — useful if you want to paste a screenshot into a document, email, or chat without dealing with the file at all.
Second, if you are a student or professional who annotates screenshots frequently, consider pinning the Gallery app to your shelf for one-click access. The moment a screenshot lands in your Downloads folder, you can open and mark it up in seconds.
Third, learn the keyboard shortcut by touch rather than looking down. The muscle memory for Ctrl + Show Windows and Ctrl + Shift + Show Windows develops quickly with a few days of regular use, and being able to capture your screen without breaking your visual focus is genuinely useful during fast-paced tasks.
Finally, remember that the clipboard copy option from the notification popup does not save a file — if you dismiss the notification without saving and only copied to clipboard, closing the app you paste it into without saving will lose the image. Always save important screenshots explicitly to a named file if they are worth keeping long-term.
Conclusion
From the instant full-screen keyboard shortcut to the precise partial selection, from the versatile Screen Capture toolbar to the tablet-mode power button method, you now have every tool you need to take a screenshot on Chromebook in any situation. Chrome OS has invested seriously in making screen capture accessible, flexible, and integrated — and the more you use these methods, the more natural they become.
The key takeaway is that there is no single “right” way to take a screenshot on Chromebook — there is the right method for each specific situation. Full-screen for speed, partial for precision, window mode for clean isolated captures, and tablet shortcuts for hands-on use. Combine those with smart save location choices and the built-in annotation tools, and your Chromebook becomes a surprisingly powerful documentation and communication tool.
Mastering the screenshot on Chromebook is a small investment that pays off every single day.
Frequently Asked Questions About Taking a Screenshot on Chromebook
What is the keyboard shortcut to take a screenshot on Chromebook?
To capture the full screen on a Chromebook, press Ctrl + Show Windows (the Show Windows key looks like a rectangle with two lines, typically where F5 would be). To take a partial screenshot, press Ctrl + Shift + Show Windows and drag to select the area you want. Both shortcuts save the image instantly to your Downloads folder and trigger a notification popup in the lower-right corner.
Where are screenshots saved on a Chromebook?
Screenshots are saved by default to the Downloads folder on your Chromebook. You can find them by opening the Files app and navigating to Downloads. Each screenshot is named with a timestamp for easy identification. You can change the default save location to Google Drive or another folder using the settings icon in the Screen Capture toolbar.
How do I take a screenshot on a Chromebook in tablet mode?
When your Chromebook is in tablet mode — folded back or with the keyboard detached — press the Power button and Volume Down button simultaneously for about one second. The screen will flash briefly and the screenshot will be saved to your Downloads folder. The same notification popup appears, giving you quick access to view or share the image.
Can I take a scrolling screenshot on a Chromebook to capture a full webpage?
Chrome OS does not natively support scrolling screenshots — captures that extend beyond what is visible on screen. To capture a full webpage, you need to install a Chrome extension such as Nimbus Screenshot, Lightshot, or GoFullPage from the Chrome Web Store. These tools add scrolling capture functionality directly into your browser and are widely used by anyone who regularly needs to document entire web pages.
How do I annotate or edit a screenshot on my Chromebook after taking it?
Open the screenshot in the built-in Gallery app, which provides basic editing tools like crop, rotate, brightness, and contrast. For annotations — adding arrows, text, or highlights — use the Markup tool within Gallery. For more advanced editing, you can use Google Photos or install a dedicated annotation extension from the Chrome Web Store. The Gallery app is the fastest option for quick edits immediately after taking a screenshot on Chromebook.